


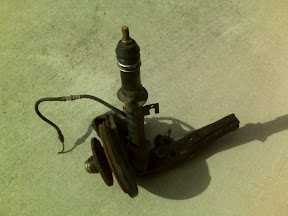
34. Preparing Front Struts
 Preparing the front struts from a 1st generation RX-7 to be converted into traditional uprights is easy... just disassemble and cut them in half! The struts are nothing more than large dampers like you would find in a typical coil-over assembly. That being said, we know that the strut is filled with hydraulic fluid and its contents are under pressure, so some care should be taken.
The first step is to remove the wheel hub/brake rotor assembly, which is all one piece in the case of the first generation RX7. I was careful when removing the brake calipers because I will probably rebuild and reinstall them on the finished car. I was not so careful with the hub/rotor assembly, wheel bearings, or the brake pads because I had already sourced a new set from the local auto parts store for a reasonable price. The importance of replacing the bearings, bearing carriers, brake pads and rotor all at the same time (or at least machining a new face on the old brake rotors) can not be overstated. As an absolute rule, I always replace both sides of a friction-interface (clutch disks, bearing faces, brake pads, etc.) at the same time, even if it doesn't seem to be economically justified. We all learn the hard way that the only alternative is more time and more money down the road (usually due to premature failure of the most recently installed parts, of course).
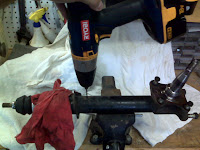
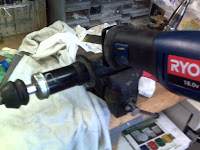
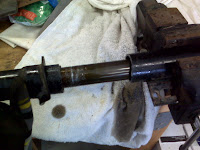
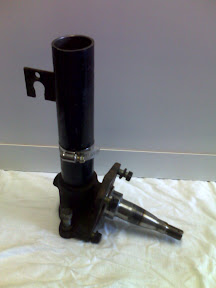 The whole assembly is held place with a bench vice at this point. A small hole was drilled in the side of the strut to safely relieve the internal pressure. This probably wasn't a critical step, but it is always good to be safe since I wasn't exactly sure what I was getting in to (one step at a time). In the photos you can see that a pile of old rags was placed on the work bench below the strut. This was done for two reasons... 1) to separate the work piece from the background when taking a picture, and 2) to catch all of the hydraulic fluid that escaped from the strut while I used an 8" sawsall to create an upper and lower half. There was no need to use a measuring tape at this point... the only objective was to remove and discard the upper half and the inner workings, leaving what is already starting to look like traditional upright, albeit very tall. A hose clamp was placed on the strut tube to designate where the strut would be cut a second time with a bit more care.